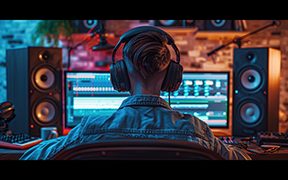


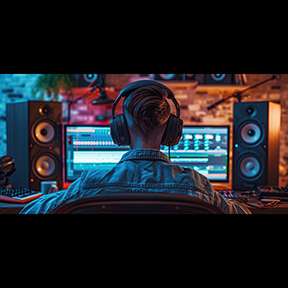

Of the many technological innovations available to music teachers, digital audio workstations (DAWs) represent one of the most powerful and flexible tools to support creativity and performance. Many readers are likely familiar with DAWs such as Garageband, Audacity, Soundtrap, or Logic Pro. These software applications enable users to record, edit, and mix multi-track recordings on computers, tablets, and phones. The increased availability and affordability of DAWs have opened space for many students and educators to exercise musical roles outside the domain of the typical performer or conductor. For example, during the pandemic, some choral directors used DAWs to create virtual choirs when in-person singing was impossible.
1) Students themselves may use DAWs to arrange, record, and produce their own music.
2) In general, recent research suggests students and music teachers alike are interested in integrating creative musicmaking with DAWs into classroom instruction.
3) Given the increased interest in these platforms, it may be important to explore how teachers might effectively integrate DAWs into the choral classroom.
Of course, new technologies do not need to be integrated simply because they exist. Still, choral educators might consider if DAW-based creative projects represent an opportunity to extend or deepen student learning in their classroom.
4) Therefore, the purpose of this article is two-fold: (a) examine how creative music making with DAWs might support learning in the choral classroom, and (b) explore several practical DAW-based project examples for the choral classroom.
First, we will explore general recommendations for finding and utilizing a DAW suited to the needs of your students. Second, we will present a few guiding principles for integrating DAWs into the choral classroom. Finally, we will share three practical project examples—including instructional videos—that may be useful to enhance your instruction.
Choosing and Learning a DAW
If you are considering DAW integration in your classes, first decide which DAW best suits your needs.
If you are just beginning to explore DAWs in your classroom, we recommend web-based DAWs like Soundtrap, Soundation, or Bandlab. These DAWs are accessible from virtually any computer with internet access because they run within a web browser (e.g., Chrome, Safari, Firefox) and operate on reasonably priced cloud-based subscriptions. Web-based DAWs might be appropriate for schools with either limited computer access (e.g., one or two shared computer labs or laptop or one-to-one Chromebooks. If you have access to a Mac lab or iPads, Garageband is free and is tremendously versatile. If you are looking for more robust software options, you might consider Logic Pro X (Mac), Ableton Live (PC/Mac), and Cubase (Mac/PC). If you are unfamiliar with DAWs and wish to spend some time learning to use them, we recommend attempting a few projects on your own before starting with students. For example, arrange a portion of a folk song and record it using the DAW. Once you have arranged the song, learn to record your voice and instrument using headphones and your laptop or tablet microphone. Be sure to adhere to the metronome click during recording. Once you record the essential parts (e.g., vocals, guitar, ukulele, or piano), use the loop library to add supporting tracks like drums. Use virtual instrument tracks to record a bass line or other additional parts. Exploring the DAW with your own personal project is the best way to develop your understanding of how it works. For more guided instruction, see the video links for each project below.
A Few Guiding Principles for Integrating DAWs in the Choral Classroom
Principle #1: Organize Creative Projects
The creative process can be uneven as students work back and forth between idea generation, editing, and refining. Nevertheless, it is important to structure creative projects within the classroom, so students are not overwhelmed by choice or lack of direction. First, be sure the students have the prerequisite skills to complete the project at hand. If students lack the requisite knowledge to complete the project, initiate a series of small introductory projects that enable them to develop their musical, compositional, or technological abilities. Second, demonstrate and explain the final product at the project’s outset. Teachers might provide example projects or rubrics as guides. Third, guide the students through the various stages of the project. Each step of this process will require both imaginative and discriminative thinking. Allow time for idea generation at the outset (i.e., brainstorming). Next, provide teacher and student feedback as students clarify their ideas. Finally, encourage students to refine and finalize their end-product, and allow students to celebrate and share their work with peers.
Principle #2: Use Technology to Support Student Learning
Each teacher must decide how musical content, pedagogy, and technology should work together to support student learning. No single creative project or technological solution works best for every classroom. Choral educators must decide which technologies and creative projects will deepen and extend the students’ learning within their classroom. Therefore, consider DAW-based projects critically and plan those you feel will enhance your instruction and provide meaningful creative opportunities for your students.
Principle #3: Varied Practice Deepens Learning
When learners practice their skills in different ways (varied practice) and apply key concepts to new situations (transfer), their learning tends to be deeper, longer lasting, and more readily applied to unique situations. At first glance, it may seem that DAW-based musical projects and choral singing are unrelated. However, consider how working in DAWs might extend and enrich essential concepts for students. For example, choral directors often instruct their choirs to blend within their section and across the choir and use many techniques to achieve a unified sound (e.g., listening, vowel alternation, tone placement). Similarly, to achieve blend in the DAW environment, students might mix the volume of voices or change the timbre of voices using digital effects. Fundamentally the students are exploring the underlying principles of blend (i.e., timbre adjustment, volume) and how to achieve blend in both environments. Applying skills and ideas in several unique settings may deepen understanding for choral singers and enhance performance. The examples below highlight how each project might support conceptual learning within the choral classroom.
DAW-Based Choral Music Projects: Three Examples
Remixing Choral Literature https://youtu.be/zrN2G77TmAY
In this first project, students will create a new selection of music by remixing a pre-existing piece of choral literature. Remixing in this way can deepen students’ understanding of a particular selection and support a sense of pride by generating a creative project that is uniquely their own. In this example, students will deepen their familiarity with an existing piece of choral literature while simultaneously celebrating their own creative agency. The student will explore variations between genres and fuse the type of music they find compelling with a piece of choral music chosen by their instructor. When you have chosen a piece, upload an .mp3 file to your Google Drive or Canvas Files. For best results, this selection should have a constant BPM and should not include accelerandos or ritardandos. Additionally, it is best to choose an a cappella piece in a simple time signature such as 3/4 or 4/4. Unless incorporating a song from the public domain, it is essential to utilize these works strictly in an educational setting since reproduction or mass distribution can be subject to copyright infringement.
STUDENT INSTRUCTIONS:
1) Download the file of the original song onto your hard drive.
2) In your BandLab account, click “Create” at the top right-hand corner of the screen.
3) Label the project “Choir Remix Assignment_ Student’s Name.”
4) Set the metronome to the corresponding tempo of the selection.
5) Either click “Drop a loop or an audio/MIDI file” to import your original track. Alternatively, drag and drop the selection into the workspace.
6) Move the track as necessary to calibrate the metronome with the downbeat. Turn on the metronome to verify the subdivision of the measure lines up with the song.
7) Click on “Bandlab Sounds” at the bottom, righthand corner of the screen, opening up a submenu on the right side. Click on “Loops” at the top of this menu.
8) Click on “Instruments” and choose from variety of different category filters. We recommend choosing “beats” or “percussion” to start.
9) Click on the play icon on the left side of each audio clip to sample the various beats.
10) Drag and drop different combinations of these musical excerpts, carefully lining them up with the downbeats in the workstation. To repeat the example, hover the mouse on the upper-right hand corner of the loop, click the icon, and then drag to repeat as many times as desired.
11) Use at least three independent samples when coming up with your remix, including at least one instance where the different beats overlap and possibly an a cappella section.
12) When pleased with your remix, export your selection by clicking “File,” then “Download,” then “Mixdown.” Save this file to your hard drive.
13) Upload your completed project to Canvas or Google Classroom with a brief description of something you learned or enjoyed during the process. for a Day!
A Lesson on Balance
Our second example allows students to customize the balance between voice parts of a given set of individual practice tracks, allowing the choristers to demonstrate one facet of artistic control that is typically limited to the director. Blend and balance are essential keys to a fine-tuned choral performance. However, students in the choral ensemble rarely experience the art of balance other than being asked to reduce or increase the volume of their individual parts within the context of an ensemble. Allowing students to adjust the balance between sections in a DAW deepens their understanding of the intricacies involved in negotiating the prominence of individual voice parts within a choir and enables them to utilize technology to see this aspect of choral singing in a new way. In this lesson, the teacher will need to either seek out or create examples of multi-track recordings of choral pieces (when each track is individually produced) and upload them to their Canvas or Google Classroom site for the students to mix. For this example, we will use Os Justi by Anton Bruckner.
STUDENT INSTRUCTIONS:
1) Download all voice parts to your computer’s hard drive.
2) Go into your Bandlab account and click “Create” at the top right-hand corner of the screen.
3) Label the project “Director for a Day Student’s Name” 4) Import each individual voice part track into the workstation by either dragging and dropping them or by clicking “Drop a loop or an audio/ MIDI file” to open the import selector. 5) While listening to each track, use the sliders on the left side to balance the voices so that you can hear all the voice parts.
4) Extra Credit: Students may utilize automation to bring up and down the volume of each individual line at different moments in the selection. For this option, students would click on the diagonal line with a dot on either side. This icon is to the right of “Add track.”
5) To utilize this function, double-click the line over the track to create a nodule. Every nodule created allows for dynamic modification.
6) When pleased with your remix, export your selection by clicking “File,” then “Download,” then “Mixdown.” Save this file to your hard drive.
7) Upload your completed project to Canvas or Google Classroom with a brief description of something you learned or enjoyed through the process.
Revitalize Solo Accompaniments with the Flexibility of MIDI Instrumentation https://youtu.be/47_3dJoG6iI
Revitalizing a solo with nontraditional instruments can support student learning and encourage positive practice habits. In this lesson, students will have the opportunity to customize an accompaniment track based on their preferred instrumentation. Utilizing the DAW to modify filters of pre-existing MIDI pitches allows students to change the timbre of the sound while still maintaining the pitches of their accompaniment. By making the selection more personalized, students may be encouraged to listen and practice their solo repertoire more frequently and effectively. For this example, we will use America the Dream by Steve Schuch, a modern take on the traditional America the Beautiful. Before the student interacts with the DAW, the teacher should take the following steps to prerecord the accompaniment:
TEACHER INSTRUCTIONS:
1) Log into your Bandlab account and click “Create.”
2) When entering the workstation, click “Instruments.”
3) Set the metronome to the given BPM of the selection you are recording.
4) Click the record button, indicated by the red circle on the top center of your DAW.
5) Play the accompaniment using the MIDI keyboard. If your piano skills are remedial, you may also choose to play one hand at a time and layer the others in later.
6) Create a new track. Play the right hand of the accompaniment using the MIDI keyboard in a similar fashion as step 5. For those who want to add more, here are two suggestions:
- a) Create 1-4 countermelodies, arpeggiations, or chords, each on a new MIDI track.
- b) Record yourself singing the given selection to serve as a vocal model for your student.
7) Export each channel individually by clicking on the three dots on each track. Choose “export MIDI” on your accompaniment tracks and “export as WAV” on your vocal tracks if you record them.
8) Place all these files in a folder on your Canvas Account or Google Drive for your students to access.
STUDENT INSTRUCTIONS:
1) Download all midi tracks and sound files provided by your instructor.
2) Log into your Bandlab Account and click “create.”
3) Import all downloaded files into your workstation.
4) On each accompaniment track, customize the instrumentation by clicking on the channel and choose a different instrument from the screen’s drop-down menu on the bottom left-hand corner. Often, the default instrument will be grand piano.
5) Practice your solo with your newly customized accompaniment.
6) Extra Credit: Record yourself singing your solo with your customized accompaniment and export your work by clicking “File,” then “Download,” then “Mixdown.”
7) What different combinations of instruments did you find the most appealing in the process? What were some instrumental combinations that did not work particularly well together?
Conclusion We believe DAWs represent a unique opportunity for learning, creativity, and technological integration for choral educators. Consider attempting some of the example projects from this article in the future. With careful planning, DAW integration may become a new and compelling feature of your choral music program.
David Haas is director of choral activities at Iowa City West High School and a Ph.D. student in music education at the University of Iowa. haas.david@iowacityschools.org
Seth Pendergast, Ph.D., is assistant professor of music education at the Colorado State University School of Music, Theatre, and Dance. seth.pendergast@colostate.edu .


