


When it comes to kids and technology, there are three words that come to mind….besides “don’t break it”. They are, in no particular order, durability, quality and reliability. As teachers, we need technology that will stand the headphone-cord-tangled-around-the-legs moments or the recording-too-close-to-the-edge-of-the-desk moments. We need quality tools that motivate our students to make more professional sounding recordings, rather than seeing how distorted they can make their breath sound. We need equipment that can be used again and again, not expensive toys to add to the technology graveyard in the back of the band closet. Thankfully, we are not the only ones aware of this technology trifecta. It’s the companies that are now rising to the challenge to create low-cost, high quality products that are both professional and kid-proof (excluding slime proof). They care about student experiences and your experience, designing tools that are portable and practical for any age-classroom. It’s an amazing time to witness this growth of music technology in education, as it’s really the first time in history that professional equipment has been made affordable and accessible. It’s just our job to pick from the pile. An easy choice right?
Wrong. Even with the endorsements of corporations and small businesses, the market is still so saturated with news of the “next best thing”. Make one attempt to search “USB microphones” online and the task will start to feel like navigating an internet escape room. It’s no wonder why we rely so heavily on recommendations, and part of the reason why our collective experiences with technology can become so much more valuable when shared. Facebook is great if the thread doesn’t become a dumpster fire of accusations (a seemingly common theme among today’s edu posts). Conferences and exhibits are one of the better methods for selecting gear before making a purchase order. Meeting the creators is a real advantage as they demo their products, offer you free samples, and maybe invite you to their office in Italy (true story)! If you’ve ever been to the NAMM show, you know what I mean. It’s a microcosm of musical magicians, machines and their makers. It’s not a cheap trip, but it’s certainly worth the time if you’re investing in gear for the next ten years (or until the USB cables inconveniently become obsolete, again).
One of the most popular gear being discussed for classrooms right now is microphones. They often come in a variety of sizes, price points and wield quite a list of necessary (and unnecessary) features. Whether you’re outfitting a whole music tech lab or a few practice rooms, it’s important to consider classroom proof components like build quality, polar pattern, noise reduction, portability, sound quality and ease of use. USB microphones have come a long way from their plastic-on-a-post predecessors. Knowing what’s available and possible use-cases could really help narrow down the list.
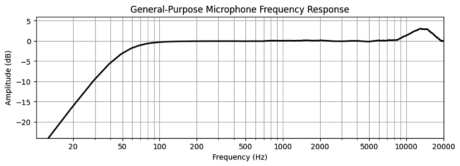
Did you know you can visualize how a mic will sound before purchasing it? One of the ways you can do this is by looking at the microphone’s frequency response charts. These charts show how a microphone responds to sound across the audio spectrum. Most general-purpose mics are engineered to have a mainly flat response, though certain bass or treble frequencies are often boosted to “sweeten” the sound quality.
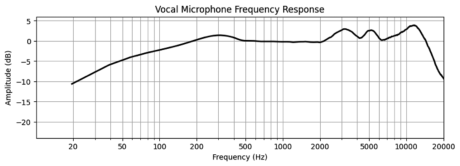
Vocal mics tend to have less of a flat response as they are designed to highlight specific treble frequencies in the human vocal range. They are also engineered to reduce any unnecessary noise or sibilance as well, especially coming from breath or wordy consonants.
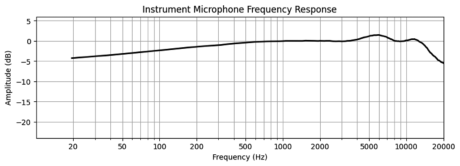
Instrument mics tend to have a wider frequency range to accommodate lower tones from bass, guitar and drums. This is an essential feature since the bass roll-off on a vocal mic is around 50 Hz, attenuating even a low E string on a guitar.
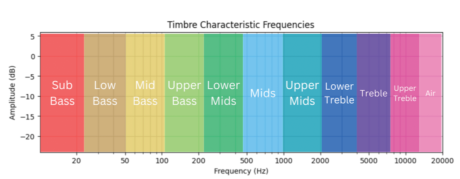
The final chart visualizes the different timbre qualities within the frequency spectrum. Keep in mind that the human hearing range is from 25 Hz to around 16kHz. You can find additional instrument EQ charts online to reference as well with a simple good search or on sites like Sweetwater.com or GuitarBuilding.org.
Now, for a studio recording experience, we’re going to look at condenser microphones. As opposed to the popular dynamic microphones (the ones feverishly swung around the Masked Singer), these condenser mics are designed to pick up high-quality audio with very little room sound. This is so producers can use the recorded dry signal to add their own effects chains. For your young producers, this can often look like adding a ping pong delay or mimicking the reverb of a giant cathedral space. It’s best practice to record this way in a classroom. Be mindful however, that not all condenser microphones are created equal. Some are more sensitive than others. This is a problem I’ve had with the majority of microphones I’ve tested. They consistently pick up the noise bleed from around the room. Unless you have a designated space, it can be really hard for Sean to make a clean rap recording without including an adlib of Ella’s found sound recording of a tin can. An embraceable sound for some creators, but a major distraction for the majority!
Speaking of noise reduction, another notable feature is microphone polar patterns. These patterns, as shown below, diagram circular areas most sensitive to incoming sound waves. Any additional noise picked up outside of the boundary lines are designed to be significantly reduced. Here are the most typical polar patterns you’ll encounter with condenser microphones.
 Omnidirectional
Ideal for: recording live ensembles (band, choir)

Cardioid
Ideal for: recording isolated vocals

Supercardioid
Ideal for: recording isolated instruments

Figure 8
Ideal for: Broadcast, podcast, interviews additional room tone (strings, percussion) or general room ambience
The ideal scenarios for each of these patterns is not prescriptive. In fact, many professional producers consider microphone selection to be an artistic choice. The best way to know what works is to test it out and see which pattern delivers the best quality for your recording. For example, I have heard that if you put a slice of bacon around an omnidirectional mic, it gives the recording a smokey timbre. I’ve yet to fire up the stove for that one!
When it comes to build quality, it’s helpful to know what material the chassis (body) is made of. Currently, the most common options are iron, brass, aluminum and metal/metal alloys. As a helpful comparison from strongest to weakest, we’d find metal alloys (e.g. steel) to be a top contender followed by iron, brass, aluminum, and metal. If you’re planning on students handling their own condenser mic, invest in a microphone with a more durable chassis. This will help extend the lifespan of your gear and keep your mics (and your sanity) in good shape for years to come!
Recently, at the Audio Engineering Society Conference in New York City, I stumbled upon a travel condenser microphone from Apogee titled the MiC Plus. After a quick test recording, I was blown away by how much noise reduction was taking place. All background sound wasn’t completely eliminated, but it was significantly diminished. The presence of my voice was clear and took center stage, even amidst the show-room floor chaos. The chassis was also engineered with an extremely durable metal blend with a steel mesh enclosure for the capsule. I could certainly see this type of mic holding up in a variety of different use-cases. Bring on the bacon!
Hopefully highlighting the components within our technology trifecta helped significantly narrow down your search. Keep on the lookout for the next article where we’ll explore microphone recording techniques, including popular effects like EQ and compression for even more professional recordings.


