


By Gillian Desmarais
The audio interface, successor of the late 1990’s sound card, continues to be a staple in professional and home recording studios across the country. Its efficacy, however, still remains a mystery among many musicians due to being “behind-the-curtain” in music studios. In this article, we’ll discuss how they work, why they’re relevant in the modern music classroom, and how interfaces like the Apogee BOOM seek to break the mold on previous models.
With studio-quality tools being affordable and accessible, and in turn, increasing the demands of the music industry, it’s advantageous for musicians to understand how to utilize microphone gear. Audio interfaces surprisingly play a crucial role in it all. So, what are they, and what do students need to understand about them? Here are some noteworthy applications.
The Two-Way Translator
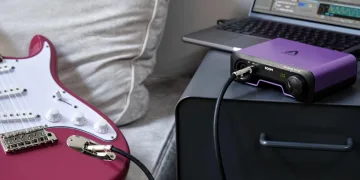
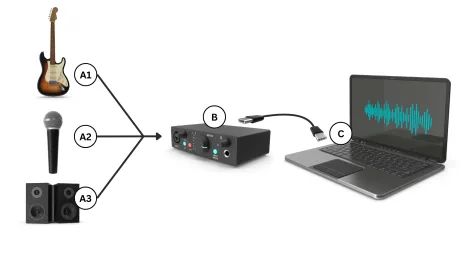
The main role of an audio interface is to convert sound waves into digital code. To further explain to your students, you might compare an interface to a “language translator”. In the way two people who speak different languages might rely on a middleman to translate, audio interfaces do the same for microphones and computers. Since microphones collect voltage impulses, or electrical signals, they cannot directly communicate with computers without the signals first being translated into binary code. For that reason, audio interfaces are often called ADC units (Analog-To-Digital Convertors) in the way they quickly convert data over for the computer. The data can then be edited in a Digital Audio Workstation (DAW) like Ableton or Logic. Now you’re speaking my language!
The Amplifier
Diagram of Interface Signal Chain
When a microphone begins converting waves into electrical signals, the initial sound level is often weak. This is where the interface becomes a vital component to the set-up. Many audio interfaces contain a built-in preamp that works to amplify the volume of the signal before it’s converted to data. To explain to students, its impact is like that of an amp for an electric guitar. The guitar strings alone are barely audible. Upon being plugged into the amp, the signal is boosted by 20-30 watts, making the sound loud and clear to our ears. Like guitar amps, they also impart character and robustness to the sound. Similar to comparing the flavors of Vox vs Fender amps, different interfaces can have unique sonic qualities. That’s why it’s important to compare models and find the tonal quality that’s right for you and your students.

The Generator
Anyone new to studio microphones, consider reading, “Testing 1..2..3.., Choosing The Best Microphone for Your Classroom” (January, 2025, SBO+) if you’re interested. Condenser microphones are commonly used in music studios and DIY recording studios as they are designed to pick up a high quality signal. Due to the nature of their internal circuitry they require a 48V input, which is where the audio interface’s “Phantom power” comes in. Students love this “superhero” title! Phantom power, recognized as a 48V switch, discreetly provides power to the microphone without impacting anything else. Toggling this 48V switch will turn the microphone on and off. The Apogee Boom interface’s phantom power is so discreet, it’s not even located on the console! Instead, it’s featured inside the input settings in the included Apogee Control 2 software. Students will be unlikely to forget this feature, both for its name and its essential role in recording!
The Control Center
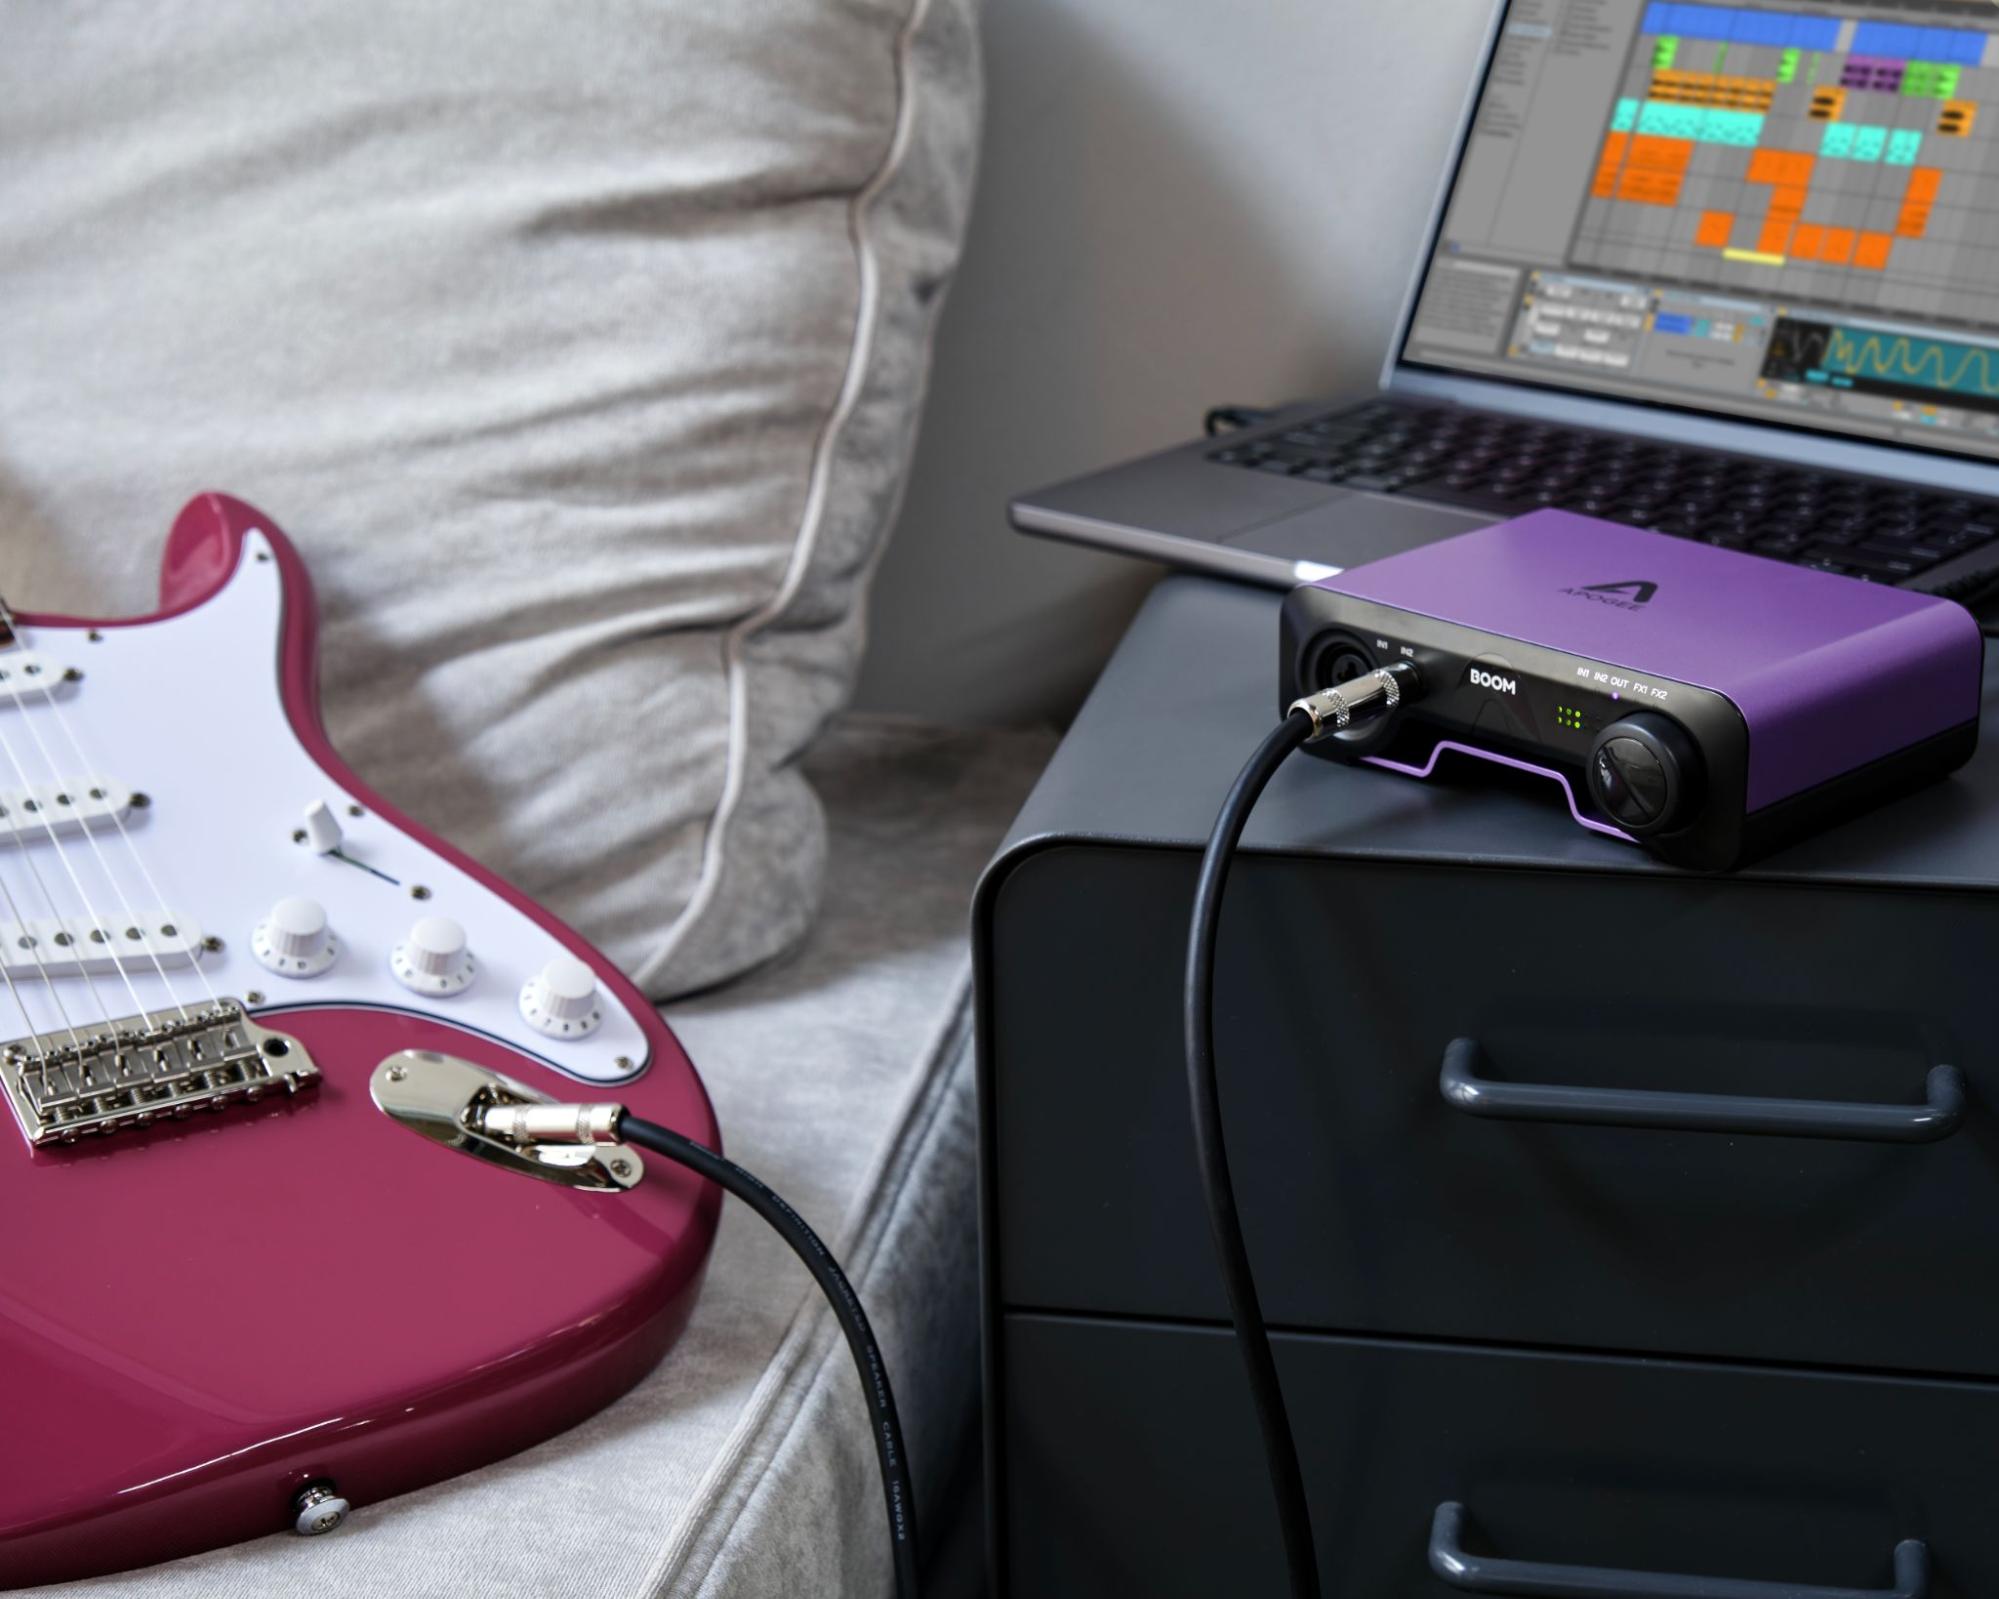
Most utilities of an audio interface can be found on the control center. Let’s take a closer look at the Boom interface to locate these components.
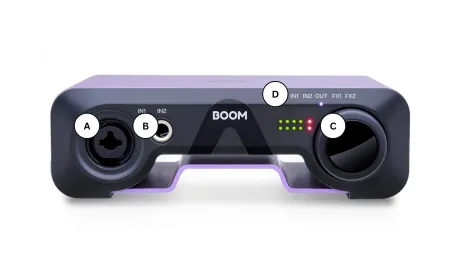
A unique aspect of the Boom interface is its minimalist control center design. As most interfaces sport a lot of knobs and features, the Boom is designed around students or solo musicians who need space for only a microphone and instrument. At the front side is a combo XLR and 1/4 inch jack (letter A) that duals as a microphone, instrument, or line level input. To the right is another 1/4 inch jack (letter B), for instrument or line level signals. On the far right side is a large control knob (letter C) for adjusting volume. The all-in-one master knob, allows users to sift and select options from one accessible location. The two other indicators labeled FX1 and FX2 (letter D) are directly connected to the Apogee Control Center 2 App. Communicating directly with the software, you can engage your onboard controls right from the app, and vice versa.
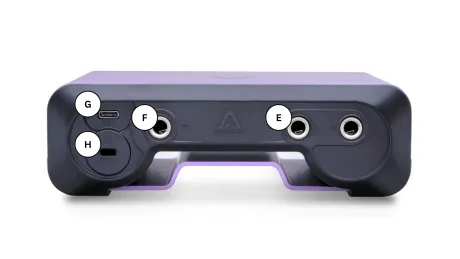
On the back side are two monitor outputs (letter E), used for left and right studio speakers. For classroom spaces that don’t have room for monitors, there’s a headphone output (letter F) on the left side. Notice that the output is for a ¼ inch jack, and not the smaller 3.5mm size normally seen on consumer headphones. This manufacturing design is because ¼ inch jacks are more robust. They can also support headphone splitters, perfect for multiple headphone use. Most interfaces do not come with ¼ inch jacks, so order them separately. They also get lost or misplaced in the classroom, so be sure to order plenty! The USB-C jack (letter G) is for plugging into a computer. Unique to the BOOM, the jack can also host any iOS devices (e.g. iPhone, iPad). This can be great for students who prefer to record on their phone or tablet.

The Digital Control Center (Apogee Control 2)
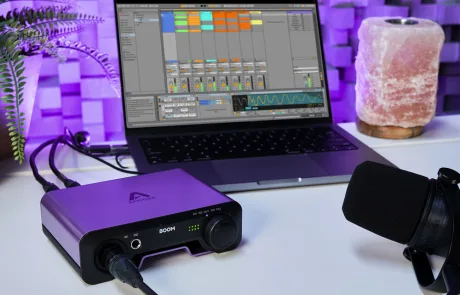
Not all audio interfaces come with accompanying software. The ones that do offer useful effects and features. With a quick download from the Apogee webpage or the app store, you can install a virtual mixer that maps directly with the controls on your audio interface. Some important features (like phantom power) are only included in the app, so plan on using it simultaneously with the DAW.
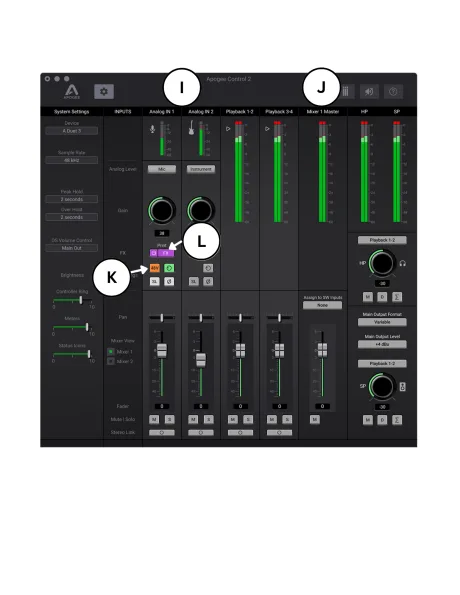
Upon opening, the easy-to-follow design lends to quick navigation around the controls. Labels at the top (Letter I) indicate two available inputs, while the output controls on the right (Letter J) provide information on playback volume. For students, this is a nice visual introduction to the mixer, displaying only the essentials for recording.
A closer look into the channel labeled “Analog IN 1” (e.g. microphone input), you’ll notice the previously mentioned phantom power (48V) and FX options. Toggle the 48V (Letter K) to begin powering the condenser microphone. Navigate to FX (Letter L) and select the button to reveal a separate plugin window containing a combined EQ and compressor. For educators not familiar with EQ and compression, these tools are essential and fundamental to mixing/mastering a recording. Designed to emulate a hardware studio rack, they can be useful for ear training specific frequencies and honing a unique quality of sound. Giving students access to these tools can be an important first step in their development as producers.

Using Your Interface in The Classroom
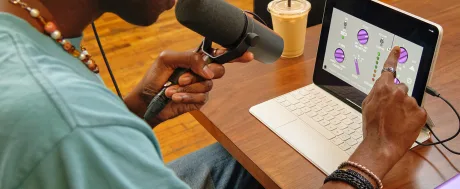
If you’re looking to create a dedicated practice room space for recording, equip computer stations, enhance a private studio, or build a DIY studio space, interfaces can greatly influence the quality and creative control of student work. As students produce the music they love, they’ll refine their ears and develop important technical skills to be successful in today’s modern industry. Having your own professional microphone set-up can also be a huge advantage for educators who are continuing to provide hybrid learning experiences. A higher quality sound can make the listening experience that much more enjoyable for students. The Boom hosts 24 bit/192KHz recording with built-in hardware DSP, giving it a very clear and focused sound. Its high-speed connections also help to ensure low-latency throughout. If it’s possible to test them, listen for overall sound quality and compare features to make the best choice.
Lastly, is portability and connectivity of your interface. Though most don’t consider this a factor, modern interfaces are now being built for travel. Consider whether smartphones or tablets are devices students will be using to make music, or whether the interface will need to travel between spaces during use. If you have students who use web-based DAWs like Bandlab or Soundtrap, there’s an additional advantage of plugging-in direct to the interface and recording onto their preferred workstation. As this wasn’t the standard ten years ago, it’s now become an extraordinary opportunity to provide another level of accessibility for you and your students.
What’s Next?
Audio interfaces are truly indispensable and will continue to be the backbone of professional music studios for years to come. As you continue to evolve your music program, consider how implementing and teaching tools can enhance your students’ experiences and prepare them for the future ahead. If you liked this resource, be sure to look for previous and future articles featuring Apogee’s line of professional recording tools, including the upcoming Hype Mic and Mic Plus Technical Comparison. Thanks for reading and happy music making!


